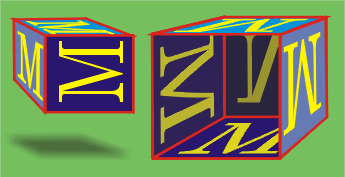
Corel Draw project
B o x e s

- Create two squares (you create squares by pressing the control key while
dragging). You may want to rotate them before we go on (I didn't in my example).
- Use the interactive extrude tool
 to get 3D-cubes. You may want to put the
vanishing point on a horizontal line (the horizon line) to get the perspective right.
- The sides of these 3D-cubes will be filled with copies of a sheet we produce.
In my case it is a yellow "M" on a blue background, but you may
as well choose something more complicated. It just should fit into a square.
When you have finished this square, group the objects on it. Activate all
objects (either by clicking on all of them while the shift button is pressed,
or draw a rectangle around all objects you mean) and then press "Ctrl-g".
Now the different objects are just one superobject.
- Now duplicate the grouped object ("Ctrl-D"). Activate the copy
and choose the interactive envelope tool
 .
You see nine squares around your object, the nodes of the
"envelope". Changing the shape of the envelope will change the
shape of your object as well, try it.
- We only need the four nodes in the corner, so delete the other four by
rightclicking on them and choosing "delete". Rightclick on each of
the four curves between and choose the option "to Line" What
remains is a simple envelope with four nodes and four straight lines
between. Now move the four nodes on the vertices of the cube for one side to
get one side covered. Duplicate it ("Ctrl-d" again) and proceed
with the other sides.
- Now, if necessary, bring the corresponding sides to the foreground by
choosing "Arrange-Order-To Front" respectively "... to
Back".
- Now you may want to change the colors of the sides slightly, emphasizing
differences of the light conditions on top of the box, or inside. For
changing these colors, you have to ungroup each superobject (side) using
"Ctrl-u" to be able to address the ingredients.
- Finally create a shadow for your flying box by clicking at the bottom of
your square, choosing the shadow tool, and dragging the shadow down to where
it belongs. Strictly speaking (with perspective) this shadow is not totally
correct.


